
Linux Server Backup and Disaster Recovery: ReaR, NAS and Encrypted Off-Site Storage
A Linux server backup is only useful if you can successfully restore it. For businesses running critical Linux servers, protecting files is important, but being able to recover an entire operating system, its configuration and its applications following a failure is equally essential.
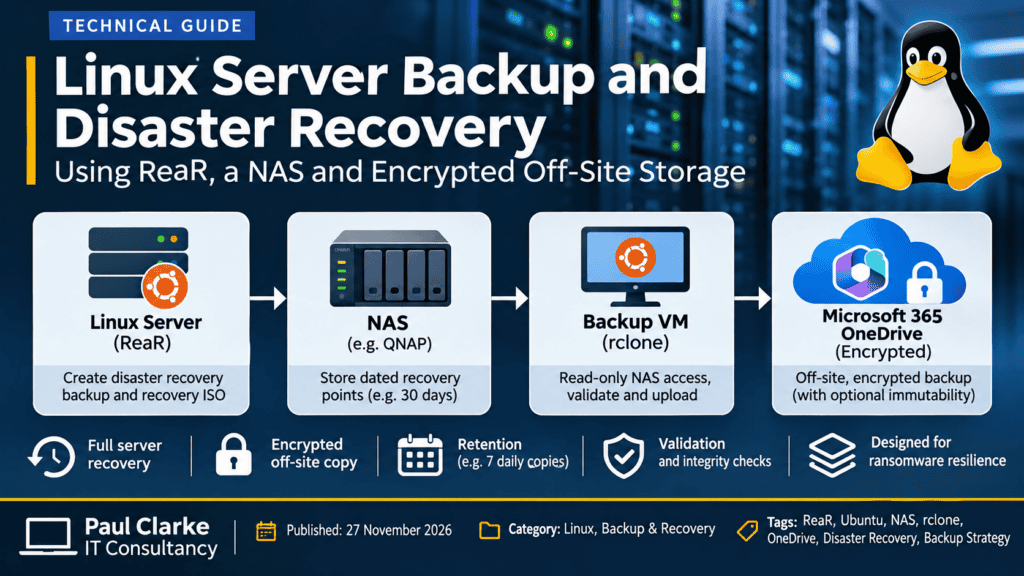
I’ve recently been developing a disaster recovery solution for my own Ubuntu infrastructure, combining Relax-and-Recover (ReaR), Network Attached Storage (NAS), a dedicated Linux backup virtual machine and encrypted off-site cloud storage.
The objective is to maintain reliable local recovery points while protecting an additional copy against hardware failure, ransomware and site-wide disasters. In this guide, I’ll explain the architecture, how to configure the components and what is required to make off-site backups genuinely immutable.
Understanding the Backup Strategy: Why One Backup Is Not Enough
Many organisations back up their servers to a local NAS. This provides convenient recovery from accidental deletion, software failure and hardware problems.
However, local backups alone have limitations:
- Hardware failure: A NAS can suffer disk, controller or filesystem failures.
- Ransomware: Attackers with sufficient access may encrypt or delete network-accessible backups.
- Site-wide incidents: Fire, flooding, theft or electrical damage could affect both the server and NAS.
- Backup corruption: An incomplete or damaged backup may remain undetected without verification.
- Credential compromise: Attackers may use stolen administrative credentials to delete backup history.
A useful starting point is the 3-2-1 backup principle: maintain at least three copies of important data, across two different storage types or systems, with at least one copy stored off-site.
For stronger ransomware protection, organisations should also consider offline or immutable recovery points and regularly verify that backups can be restored.
A Real-World Example: My Linux Backup Architecture
My implementation uses three separate systems:
- Production Ubuntu server: Runs ReaR to create disaster recovery archives and bootable recovery media.
- QNAP NAS: Stores dated local recovery points, with approximately 30 days of local history.
- Dedicated Ubuntu backup VM: Accesses completed NAS backups through a restricted, read-only NFS mount and transfers encrypted recovery points to Microsoft 365 OneDrive.
The off-site component uses rclone with its crypt functionality to encrypt files and filenames before uploading them.
During testing, I also implemented archive validation, SHA-256 integrity checks, restricted service identities, transfer locking and recovery-state tracking.
Important: At the time of writing, the automated production transfer remains under integration and acceptance testing. The OneDrive destination provides encrypted off-site storage, but it should not be described as genuinely immutable without additional enforced retention controls.
Step 1: Install Relax-and-Recover on Ubuntu
Relax-and-Recover (ReaR) is an open-source disaster recovery solution for Linux. It can create recovery media and capture the information required to reconstruct a system after a serious failure.
On Ubuntu, install the necessary packages:
sudo apt update
sudo apt install rear rsync nfs-common
ReaR’s primary configuration file is:
/etc/rear/local.confEdit it using:
sudo nano /etc/rear/local.confFor a basic NAS-based configuration using NFS, the following illustrates the approach:
OUTPUT=ISO
BACKUP=NETFS
BACKUP_URL=nfs://192.168.1.10/backups/rear
Replace the example address and export path with your NAS details. Ensure the NFS export is configured to permit the required backup operations and that the destination has sufficient capacity.
Start a backup manually:
sudo rear -v mkbackupReaR creates recovery media and, with the default tar-based NETFS configuration, an archive containing the selected backup data.
Important: ReaR configuration must be tailored to the server’s filesystem, boot mode, storage layout and recovery requirements. Not every filesystem or application workload can be protected adequately by a generic configuration.
Step 2: Understanding Where rsync Fits Into the Backup Process
There are several ways to incorporate rsync into a Linux backup strategy, and it is important not to confuse them.
ReaR’s standard NETFS configuration commonly uses a tar archive. ReaR also supports an rsync-based backup program for suitable configurations.
For example:
OUTPUT=ISO
BACKUP=NETFS
BACKUP_PROG=rsync
BACKUP_URL=nfs://192.168.1.10/backups/rear
With this method, the backup data is stored differently from a compressed tar archive. The rsync-based approach should therefore be configured and recovery-tested separately.
Another option is to use rsync to copy completed ReaR recovery-point directories to a second storage location:
rsync -avh --progress \
  /var/backups/rear-history/ \
  /mnt/nas/rear-history/
This command is an example of copying existing recovery-point directories, not a replacement for ReaR’s own backup operation.
For my current implementation, the production recovery points include compressed archives and recovery ISO files. The off-site workflow is designed around those completed files rather than assuming that the production backup itself uses rsync.
Step 3: Maintain Historical Recovery Points on the NAS
One of the most important design decisions is to avoid overwriting the only available backup.
If a server becomes corrupted and the next backup replaces the previous version, the organisation may lose its last usable recovery point.
My solution maintains timestamped backup directories, with a structure similar to:
rear-history/
├── 2026-11-17T020000Z/
│   ├── backup.tar.gz
│   ├── rear-server.iso
│   └── .backup-success
├── 2026-11-18T020000Z/
│   ├── backup.tar.gz
│   ├── rear-server.iso
│   └── .backup-success
└── 2026-11-19T020000Z/
    ├── backup.tar.gz
    ├── rear-server.iso
    └── .backup-success
The filenames above are illustrative. Actual ReaR output names and locations depend on the configuration and any additional backup-management scripts.
A completion marker is created only after the local backup has completed its required checks.
This allows a separate off-site backup service to identify completed recovery points without attempting to transfer files that are still being written.
For my infrastructure, the existing local retention target is approximately 30 days.
Step 4: Deploy a Dedicated Ubuntu Backup Virtual Machine
Rather than installing cloud backup software directly on the production server, I deployed a small Ubuntu virtual machine dedicated to off-site backup operations.
This provides several advantages:
- Isolation: Cloud authentication and encryption credentials are kept away from the production server.
- Reliability: Cloud connectivity problems do not interrupt the existing local ReaR backup.
- Security: The VM can be restricted to read-only access to completed recovery points.
- Resource management: Upload concurrency and memory usage can be controlled independently.
- Recovery: The off-site process can resume after interruptions without rerunning the production backup.
A reasonable starting configuration for a small environment is:
- Ubuntu Server 24.04 LTS.
- Two virtual CPUs.
- 2 GB RAM.
- 30 GB operating system disk.
- Network access to the NAS and cloud backup destination.
These resources should be adjusted according to backup size, transfer concurrency and the validation method used.
Install the required utilities:
sudo apt update
sudo apt install nfs-common rsync rclone
The backup VM should be maintained, patched and monitored just like any other infrastructure component.
Step 5: Mount the NAS Backup Repository Read-Only
The off-site backup VM only needs to read completed recovery points. It should not have permission to modify or delete them.
Create a mount directory:
sudo mkdir -p /mnt/rear-backupsMount the NFS export read-only:
sudo mount -t nfs -o ro \
  192.168.1.10:/backups/rear \
  /mnt/rear-backups
Verify the mount:
findmnt /mnt/rear-backupsCheck that the mount options include read-only access.
Important: A read-only mount is not a complete security boundary by itself. Access restrictions should also be enforced by the NAS, with appropriately scoped NFS exports, identities and network rules.
In my implementation, I have also developed a restricted source-reader service that provides access to approved backup paths without exposing cloud credentials.
This separation reduces the consequences of a compromise affecting the cloud transfer worker.
Step 6: Configure Encrypted Off-Site Storage with rclone
rclone is a command-line tool for transferring files between local systems and cloud storage providers.
It supports Microsoft OneDrive, Azure Blob Storage and numerous other destinations.
For this project, I configured a dedicated Microsoft 365 OneDrive for Business account and an encrypted rclone remote.
Begin the configuration process:
rclone configCreate the underlying OneDrive remote and authenticate it using an appropriately restricted account.
Then create a crypt remote pointing to a dedicated directory within that cloud storage.
For example, the resulting encrypted remote might be named:
onedrive-crypt:When properly configured, rclone crypt encrypts file contents and can encrypt filenames and directory names before they are stored remotely.
A simple manual upload command is:
rclone copy \
  /mnt/rear-backups/2026-11-19T020000Z \
  onedrive-crypt:2026-11-19T020000Z \
  --onedrive-chunk-size 100Mi \
  --transfers 1 \
  --progress
This example assumes the source is already complete and validated. A production system should additionally enforce integrity checks, capacity limits, locking, persistent transfer state and post-upload verification.
Never store the only copy of your rclone encryption credentials on the backup VM. Maintain a separately protected recovery copy and test that it can be used to decrypt the off-site data.
Step 7: Optimise Upload Performance Without Overloading the VM
During development, I tested several OneDrive upload chunk sizes using identical synthetic backup data.
The tests used encrypted uploads followed by decrypted SHA-256 verification.
The results were:
| Chunk Size | Upload Throughput | Total Engine Time |
|---|---|---|
| 10 MiB | 10.21 MB/s | 327.8 seconds |
| 50 MiB | 15.59 MB/s | 255.2 seconds |
| 100 MiB | 18.55 MB/s | 234.5 seconds |
| 150 MiB | 18.74 MB/s | 231.6 seconds |
The 100 MiB configuration provided a substantial improvement over the baseline, while the 150 MiB configuration offered only a small additional throughput benefit.
Because larger chunks also consume more memory, I selected 100 MiB as the provisional default and restricted the engine to one concurrent upload.
These results represent individual synthetic tests, not a guarantee of sustained production performance. Real throughput will depend on network conditions, source storage performance and cloud service behaviour.
Step 8: Verify Every Backup Before and After Upload
One of the biggest mistakes in backup management is treating a successful file transfer as proof that the backup is recoverable.
My approach validates the recovery point before uploading and independently checks the decrypted cloud copy afterwards.
For a compressed tar archive, begin with:
gzip -t backup.tar.gzCheck that the archive can be read:
tar -tzf backup.tar.gz > /dev/nullGenerate a SHA-256 hash:
sha256sum backup.tar.gzThe recovery ISO should also be validated and included in the recovery-point manifest.
After uploading, read back or download the decrypted cloud copy and calculate its SHA-256 hash.
The resulting hash must match the original.
The verification process should also confirm that every required file exists and that the recovery point has been completely transferred.
Remember: Matching hashes demonstrate data integrity. They do not prove that the operating system can successfully boot after recovery.
Step 9: Automate Backups Using systemd Timers
The existing production ReaR backup starts at approximately 02:00 Europe/London.
Rather than assuming the backup will always finish at the same time, I designed the off-site discovery service to check for newly completed recovery points every 15 minutes.
The discovery process:
- Checks the verified read-only NAS mount.
- Identifies timestamped recovery-point directories.
- Confirms that a success marker, archive and ISO exist.
- Checks that file sizes and modification times remain stable.
- Excludes recovery points already recorded as successfully verified.
- Passes eligible candidates to a separate validation and transfer workflow.
For example, a systemd timer can use:
[Timer]
OnCalendar=*-*-* *:00/15:00 UTC
Persistent=true
The timer should invoke a dedicated service with appropriate permissions, locking and error handling.
Source scheduling must account for British Summer Time. The backup starts at 02:00 Europe/London, while operational timestamps and logs are recorded in UTC.
In my current development environment, the discovery timer is installed but remains disabled until the complete production transfer workflow passes acceptance testing.
Step 10: Understanding Encryption Versus Immutability
This is perhaps the most important security distinction in the entire design.
An encrypted backup is not necessarily an immutable backup.
Encryption protects data confidentiality. It prevents someone without the correct encryption credentials from reading the backup contents.
Immutability is different. It prevents a backup from being altered or deleted during a defined retention period, including by accounts that would ordinarily have permission to modify the storage.
My current OneDrive implementation uses encrypted off-site storage, but the ordinary cloud account permissions do not provide a verified immutable retention guarantee.
For stronger ransomware resilience, an organisation could use a destination such as Azure Blob Storage with a correctly configured immutable storage policy.
Such a design should include:
- Storage-enforced retention: Recovery points cannot be deleted or overwritten before their retention period expires.
- Restricted credentials: The backup worker receives only the permissions necessary for its operations.
- Independent administration: Backup retention controls are protected from compromise of ordinary production accounts.
- Separate encryption: Backup data is encrypted before upload, with recovery credentials stored securely.
- Tested recovery: The organisation regularly demonstrates that retained recovery points can be restored.
Immutable storage requires careful design. Retention settings, account permissions, lifecycle rules and storage costs should all be reviewed before implementation.
It is also important to recognise that immutability protects stored recovery points; it does not guarantee that those points contain clean or usable data.
Step 11: Configure Monitoring and Retention
A backup system should report failures automatically rather than relying on an administrator to remember to check it.
Useful monitoring includes:
- Missing local backups: No successful ReaR recovery point appears within the expected completion window.
- Overdue cloud backups: No new verified off-site recovery point has appeared within a defined period.
- Transfer failures: Uploads fail, are interrupted or encounter authentication problems.
- Integrity failures: Source and cloud SHA-256 values do not match.
- Capacity warnings: Cloud storage is approaching its configured limits.
- Retention failures: Recovery-point rotation or storage-policy checks do not behave as expected.
For my implementation, the design targets seven verified daily cloud recovery points and maintains a minimum 20% storage reserve.
The system also needs to account for cloud recycle-bin behaviour, retention policies and any storage consumed by failed or incomplete transfers.
Automatic deletion should never be enabled until the retention process has been tested and approved.
Monitoring should send alerts to an independently accessible destination, so that a failure affecting the backup VM does not also prevent notification.
Step 12: Test a Complete Server Recovery
The final step is the most important: proving that the backup can restore a working server.
For a safe recovery exercise:
- Deploy an isolated virtual machine with sufficient resources and compatible storage.
- Download and decrypt a verified recovery point.
- Make the required archive and recovery files accessible to ReaR.
- Boot the VM using the ReaR recovery ISO.
- Review the disk layout and recovery configuration.
- Perform the recovery using the appropriate ReaR procedure.
- Verify that the operating system boots successfully.
- Check files, services, applications and relevant configuration.
- Document any recovery issues and update the procedure.
The recovery command normally takes the form:
rear -v recoverWarning: ReaR recovery can recreate partitions and overwrite disks. Always use an isolated test environment and verify the intended target storage before proceeding.
Restoring files successfully is only part of the exercise. Application consistency, database integrity, network configuration and service availability must also be checked.
Only after a successful recovery exercise should the organisation claim that its complete disaster recovery process has been validated.
Final Thoughts: Backups Are About Recovery, Not Just Storage
Building this solution has reinforced something I’ve believed throughout my infrastructure career: a backup strategy must be designed around recovery requirements, not simply around copying data.
ReaR provides the foundation for Linux disaster recovery. NAS storage offers convenient local recovery points. A dedicated Ubuntu VM separates off-site operations from production systems, while rclone provides flexible encrypted cloud transfers.
Adding storage-enforced immutability, independent monitoring and regular recovery testing takes the design further, providing stronger protection against ransomware and operational failures.
A backup job reporting success is useful. A verified, protected backup that has been successfully restored is what provides real confidence.
If your business relies on Linux servers and you’re unsure whether your existing backups would survive a serious incident, Paul Clarke IT Consultancy can help review your infrastructure, identify recovery risks and develop a practical disaster recovery strategy.